How to setup a LAN (Local Area Network)?
LAN Network setup and internet connection sharing.
Requirements
- Desktop computers with Network card (Nework card came as inbuilt with mother board in latest computers)
- CAT 5 / CAT 6 Cables
- RJ45 Connector
- Switch or Hub
- Broadband / Dialup modem (to set internet connectivity)
- Crimping Tool
Step 1: (Preparing Hardware)
- Cut the Cat 5 cable as per your requirements and the distance between computers
- Connect RJ45 connector as described below (Use Crimping tool)
First RJ45 Connector(one end) Second RJ Connector (Another End).
Brown White - 2-----------------> 2 Brown White
Orange - 3 -----------------------> 3 Orange
Orange White - 4 ----------- ---> 4 Orange White
Blue - 5 ---------------------------> 5 Blue
Blue White - 6 ------------------> 6 Blue White
Green - 7 ------------------------> 7 Green
Green White - 8 ----------------> 8 Green White
- Connect one side to Hub or switch and connect another end of the cable to computers' LAN port
-
Switch on all computers and Hub
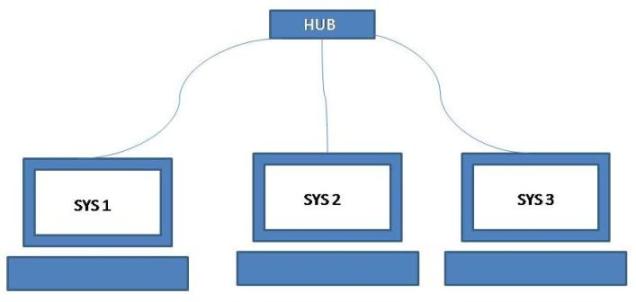
Step 2: (Configuring Your Computer)
- Note : You can skip this step if all the computers in your network has different name and you do not wish to change them.
- Right click the My computer Icon on the Desktop ----> Click Properties ---> Go to computer Name Tab if one or more of your computers have the same name change it . For Example SYS1, SYS2, SYS3. Restart is Required after changing the computer name.
Step 3: (TCP/IP Configuration)
- Go to Control Panel -----> Double click on the Network Connections Icon ---> Right click the Local Area connections -----> Click Properties (The following Dialog box will appear)
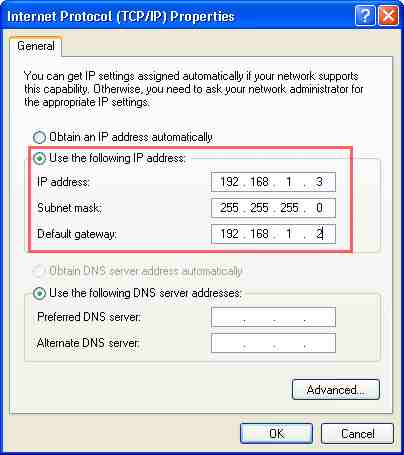
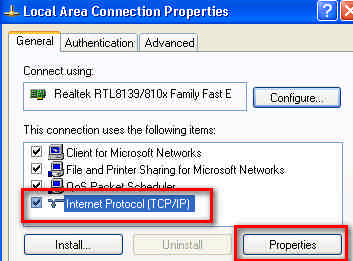 2. Choose Internet Protocol ---------> Click Properties (The following Dialog box will appear)
Set the IP Address : There are many rules in IP configuration. For simplicity we give our main server computer which have the Internet Connection as 192.168.1.2 (Do not use 192.168.1.1 because as default Broadband modem may use this IP address) and Subnet mask always 255.255.255.0. Default Gate for our network is 192.168.1.1. Default Gateway also must be same for all the computers in a network that shares internet connection.
Now we set other computers IP addresses as 192.168.1.3 for SYS2 192.168.1.4 for SYS3 .......etc.,
Click OK.
 3. Now the following message appears on Task bar Notification Area
 Now we connected our computers in Local Area Network successfully.
Step 4: (Internet Connection Sharing)
We use the LAN mainly for Two purposes
1. Internet Connection Sharing
2. File & Printer Sharing
(i) To setup Broadband connection
Just connect the broad band modem with a direct cable (the same which we used to connect the computers with Hub / Switch).
Turn on the modem and make sure all the computers in your network which needs internet connection, uses the modem's IP address (192.168.1.1) as default gateway.
Make the DNS server entries as your choice..
By default you can use modem IP address 192.168.1.1, It will automatically get the DNS Server IP address from your Internet Service Provider else you can try any other Open DNS Server addresses or the one provided by your Internet service provider.
That's all now you are connected to internet.
(ii) To setup Dialup connection
For dial up Internet connection sharing properly install the modem on your main or server computer (192.168.1.2).
And install any Proxy server program. For example AnalogX proxy. See the Read me or Manual of the Program for HTTP, FTP port settings In AnalogX proxy HTTP 6588, FTP 21.
Now connect your server to Internet i.e. , Dial and connect your Dialup modem.
Make sure all the computers in your network which needs internet connection, uses the main computer's(which connected to internet) IP address (192.168.1.2) as default gateway
Double click the Proxy server Icon to start the service.
Make the following settings in other computers in your network.
Configuring Internet Explorer:
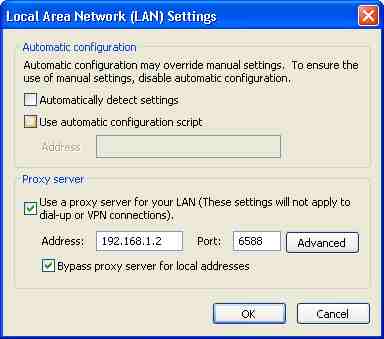
On Internet Explorer go to Tools -----> Options -----> Connection Tab
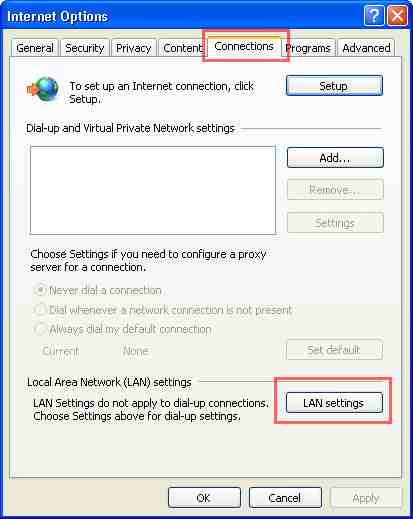 Now Click the LAN Settings Button
Uncheck the Automatically detect settings option
Now check Use a proxy server option
Address: 192.168.1.2 (Default Gateway address) Port 6588 (Refer Proxy server Manual)
check Bypass proxy server option
Click the Advanced Button configure other protocol port Numbers such as FTP.
Finally Click OK.
Close your Browser. And then Open it.
Now you can Browse.
Note : For Broadband Internet connection do not use Proxy settings. Directly connect the Cable to the Hub or switch..
Step 5 : File Sharing
(1) Share the folder in any of your computers in the network.
(2) Right Click on the folder icon you want to share, select Properties
(3) Go to Share Tab, Click Share this folder option and give share name (if you dont like the default)
(4) Tick the necessary permissions as you want
(5) Now, Go to the system, where you want to access this folder, Go to My Network Places from start menu / Desktop / Control Panel
See the Left Pannel
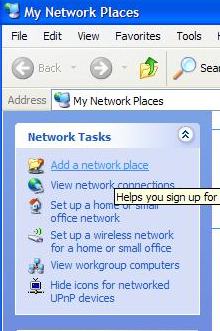
Click Next
Now downloading appears
Then click Next
Click Browse Button
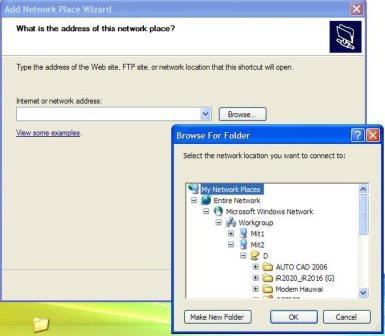
Click Your computer Name
Then choose the shared folder
Click OK
Now Click Next on the Main Dialog Box
Click Finish
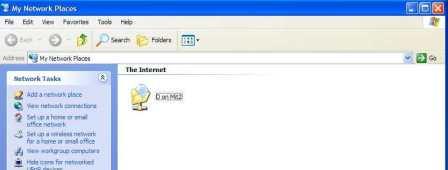
Now the Shared Folder Icon appears on the My Network Places
Thats All
Now you can easily access the shared folder of another compter.


Comments2
Great post, its really appreciate process and having it explained properly thank you!
Well explained.. thank you.